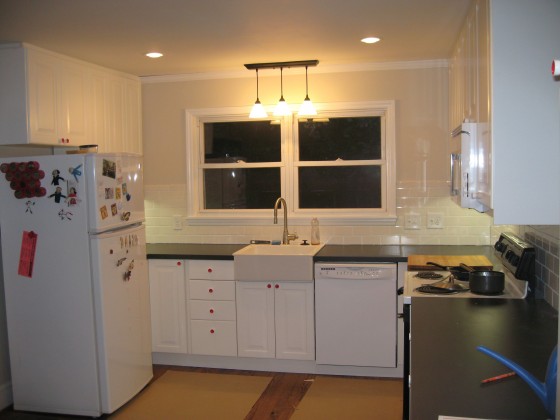
This weekend I did toekicks and light rail. IKEA toekicks are a piece of melamine-covered MDF, with a groove along the back to accept a clip. The clip clicks onto the cabinet legs, and there’s your toekick. The light rail goes along the bottom edge of the upper cabinets, to hide the undercabinet light fixtures, and is a nice little decorative finishing piece.
Friday night, I just had to cut all the toekick pieces to the right lengths, and do a cutout for the dishwasher, and they snapped on. Except for how I had one piece of toekick that was not the same as the others. There are three shades of white cabinet at IKEA – Lidingo/Stat (what I have), Abstrakt (glossy) and Adel (more cream than white). This piece of toekick was definitely Adel, not Lidingo. So I recruited a friend and took Saturday afternoon to go to IKEA (this is trip #4 for the kitchen) and exchange the incorrect toekick for the right one. We also went through the showroom, of course, where I suddenly paid a lot more attention to the weird little details of a kitchen – where’d they use cover panels, how was the toekick joined on long runs, which type of light rail did they use? I picked up a few little things, but managed to get out under $20, which I think makes it my cheapest IKEA trip ever.
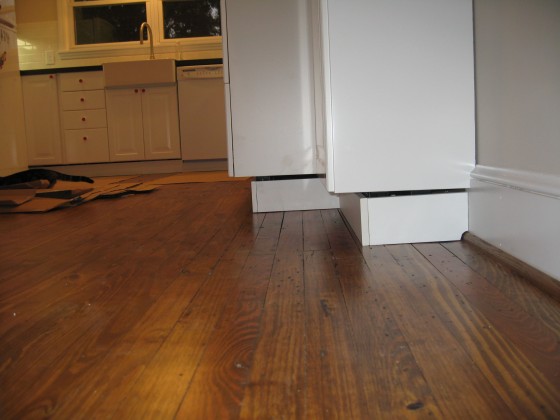
Having acquired the final piece of toekick, today I installed it, and found myself with a minor problem – because my kitchen floor was not level, at the end of the run where the pantry is, there’s a distinct gap between the bottom of the cabinet and the top of the toekick. And because it’s on the end of the run, it’s really visible. I’m going to have to buy some molding or something to bridge that gap. There’s a similar gap on the left end of the sink run, but because of the angles involved, you have to be sitting on the floor to see it, so I may just leave that one. (Shh, don’t tell anyone).
Then I did light rail, which is a much denser material than the toekick, and way nicer to cut- no shredding or random chipping. I did the stove side pretty easily, and then realized that for the cabinet next to the fridge, I was going to have to miter the corner – I chose not to put a cover panel there because it was next to the fridge. But that left me with a corner for my light rail. Luckily, dad’s table saw can cut angles, so I made all my measurements, managed to fit an 86″ long piece in my little car, and took it over to my parents’ to cut. The table saw worked great, though measuring miters is always a little confusing – I only had to re-cut once, and luckily the piece was too long, not too short. So then I got to come home and install, and now I have toekick and light rail, and I’m one step closer to done!


toe!!! kick!!!
You an I have an almost identical kitchen. I’m trying to design mine right now and am having issue because the diagonal cabinets are so bloody large that they are taking up tons of space. What did you do for your lower corners. And do you like how it works out on the top?
Hi Nicole, thanks for looking!
Yeah, those corner cabinets are huge! The one to the left of the sink is a standard corner cabinet with a lazy susan – I keep stuff I hardly use in that one, but it’s easy enough to get to. The one in the other corner is the blind corner cabinet with the pull-out, and it is AWESOME. That huge blocked space becomes really useful storage space – I keep all my tupperware and storage containers in there, and I use it all the time.
I definitely like how the top cabinets worked out, particularly not having upper corner cabinets, just having them go straight to the wall. I think it looks less closed in, and I haven’t felt like I lost any storage space. The one thing to watch out for is that you do need about an inch of filler between the cabinet and the wall to give the door space to open.
Hi there! I am so enjoying your blog. … I am currently in the middle of completing my ikea adel kitchen, can you lend some pointers on how you did the fillers? Thanks in advance :)
What toe kick color did you use?
Hi, I know this is several years old, but do you have any pictures of what you did to hide the gap from the toe kick to the cabinet? I am having that problem myself.
Hey Kathryn – I don’t have any photos that show it well, but I ended up filling the gap with a strip of wood BELOW the toe kick, to push it up to meet the bottom of the cabinets – lots of trial and error and very long skinny wedges of wood to make it work. Then I added shoe molding to cover the shims. I was lucky that my gaps weren’t more than the height of the shoe molding, but you could also do chunkier molding if your gaps are bigger.